REVIEW: HG FX-78 FULL ARMOR GUNDAM [THUNDERBOLT VER.]

Thunderbolt1

The High Grade FX-78 Full Armor Gundam from Gundam: Thunderbolt.

A while ago when I first saw the design for the FX-78 Full Armor Gundam from the Thunderbolt series I didn’t really think anything of it and thought it kind of looked a bit dumb with too many shields.

Recently, I was really impressed by the High Grade Zaku I kit from Thunderbolt and thought I would give the anime show a shot. I absolutely love the  anime show and with it I got a real appreciation for the design of FX-78, and of course it’s pilot who seems more the villain when compared to the other characters.

Suffice it to say, I purchased the HG kit of the Full Armor Gundam and I’m glad I did.

Thunderbolt7

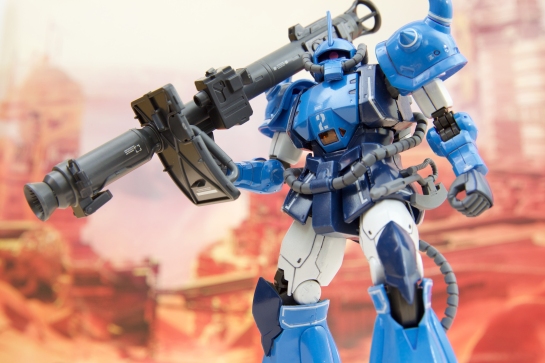
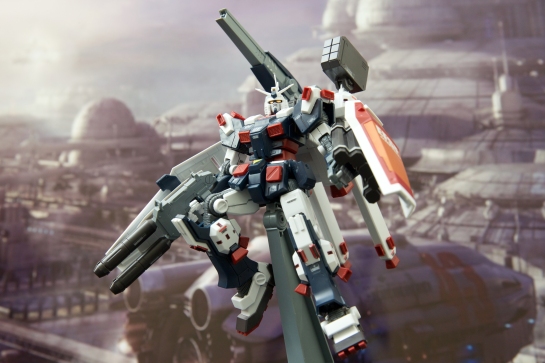
The High Grade FX-78 Full Armor Gundam from Gundam: Thunderbolt. Some heavy duty weapons the Gundam is holding, but rest assured the arms and joints can take the weight.

Thunderbolt3

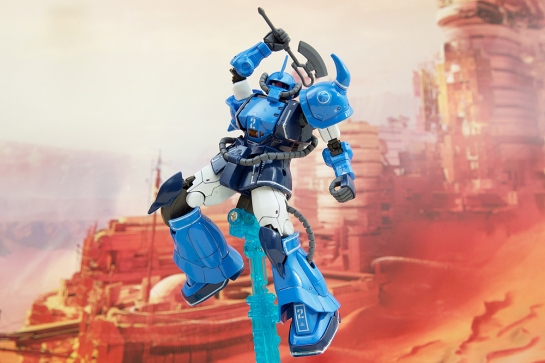
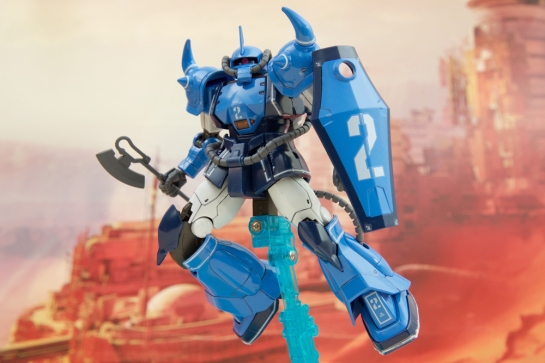
The stand the kit comes with is a must if you want to get it any type of dynamic poses due to the giant backpack that weighs the kit down.

Thunderbolt5

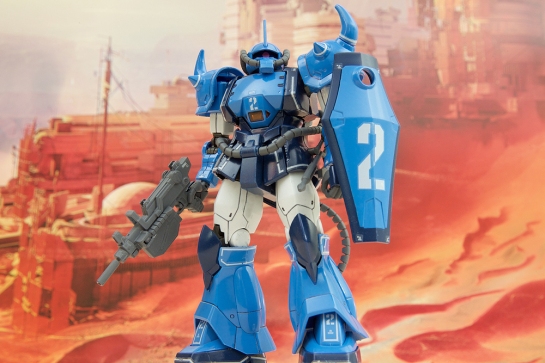
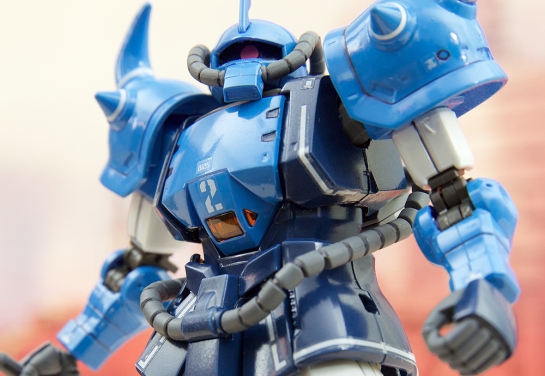
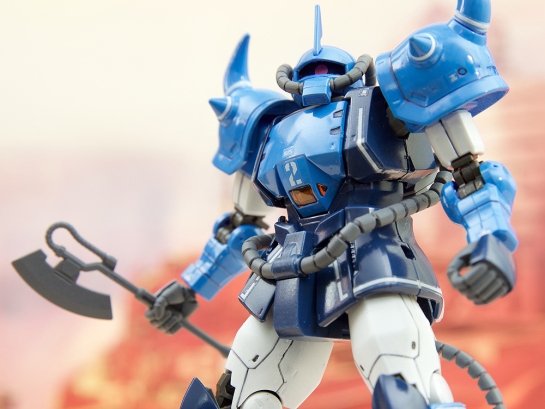
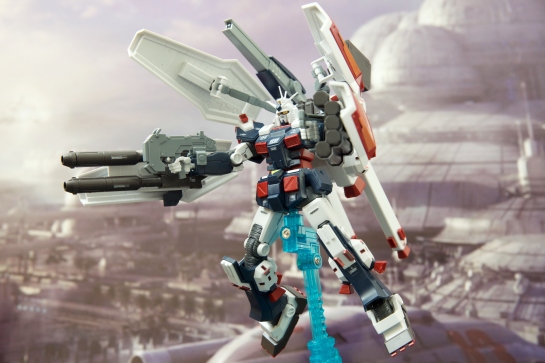
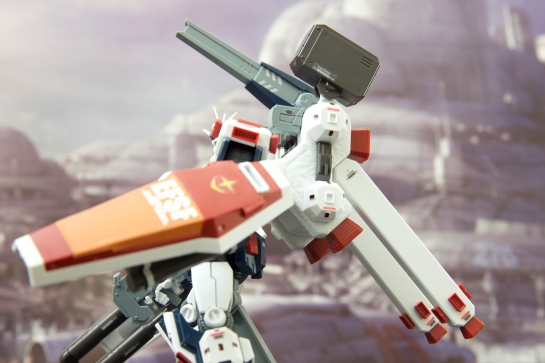
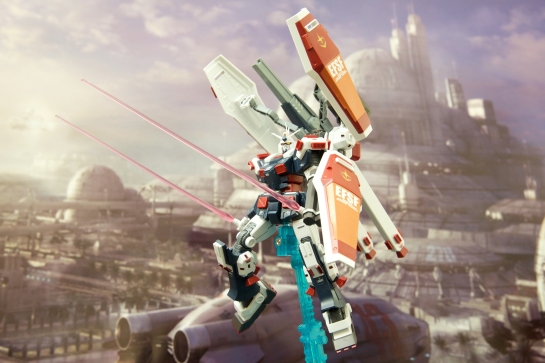
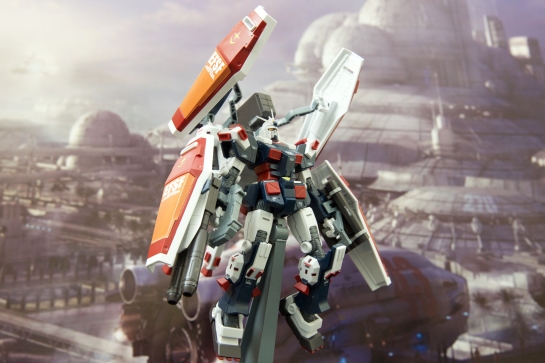
Absolutely love the mechanism in the backpack that allows the two extension arms to move the extra shields around. This Gundam is going to need all those shields in the anime series.

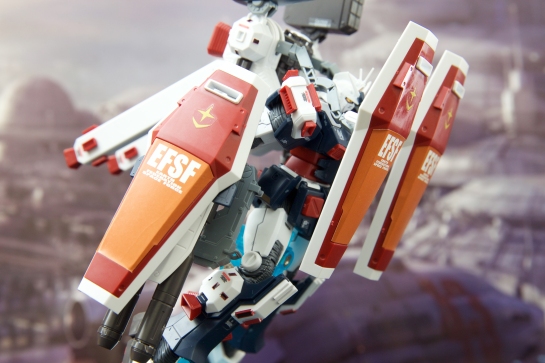
First let’s get to the subject that detracted me in the beginning off the table. The kit comes with four shields, two of which you can attach to the arms while the other two can be held by extension arms connected to the backpack. The system involved in moving those shields is pretty nice and allows a variety of positions to move the additional shields from protecting the front portion of the mobile suit to the sides.

After seeing the shields in action in the anime and having the kit and shields in my hands, it’s probably the best accessory gimmick on the kit; I’ve spent a lot of time adjusting the shields to different positions to make the Gundam look more formidable.

The kit also comes with a heavy duty backpack with missile pod, a large beam cannon and two propellant tanks attached. Having all that equipment in the back portion of the kit means it’s nearly impossible to have a dynamic pose without a stand which is provided with the model.

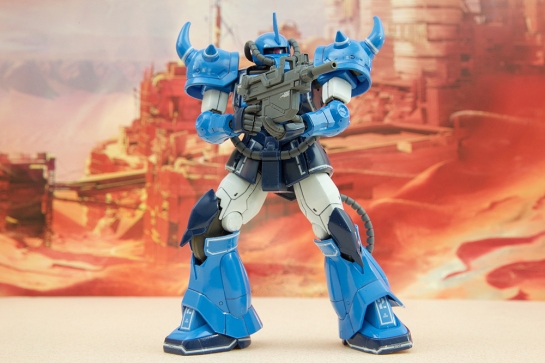
The Gundam’s main armaments are comprised of a twin beam rifle on its right arm and a five tube missile pod on its left arm. In addition, the weapons are attached to a shield. Even though each of these weapons are a bit heavy, the arms had no problem holding the weapons forward; the joints are pretty tight for this kit.

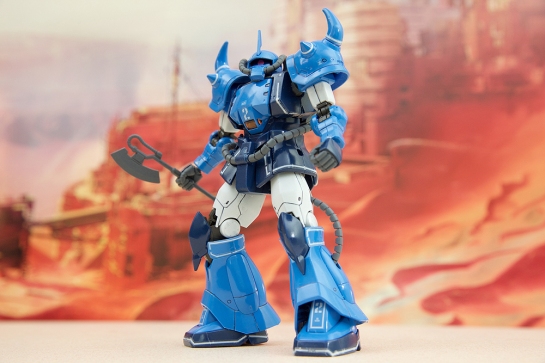
The rest of the weapons (like it needs anymore!) are two beam sabers which nicely compliment the mobile suit.

Thunderbolt8

The HG FX-78 Full Armor Gundam from Gundam: Thunderbolt armed with beam sabers. Really love the look of the kit with the additional shields.

The HG FX-78 was a fun kit to put together, and just like the Zaku I it’s got a ton of stickers. I’m a big fan of stickers so that’s a huge plus for me.

After completing this grand kit, I realized that this needs to be a Master Grade. I’m sure it’s going to become one in the future, after all it’s the main Gundam in the series.

But the High Grade model is no slouch.

Even though it’s not as poseable compared to recent High Grades, especially in the knee and elbows, it’s adequate enough to position the kit in dynamic poses armed with its heavy duty and well designed weapons. The level of detail with the assistance of decals just boots the quality of the kit to a higher degree.

I know there’s only a couple of episodes left in the Thunderbolt anime series, but I hope there’s other kits in the future if the Zaku I and FX-78 is any indication of the quality kits on the horizon.

HG FX-78 FULL ARMOR GUNDAM [GUNDAM THUNDERBOLT VER.]

+ Sleek and different design aided by multiple shields which can be positioned in a variety of ways

+ Some awesome weaponry which can be posed with ease due to tight joints

+ Details and stickers give the kit a more stylized look

– Some limited movement in the elbows and knees when compared to other High Grades

Thunderbolt6

Shields protecting the upper body and backpack armaments.

Thunderbolt4

Lifting off to kick some Zeon butt.

REVIEW: HG PROTOTYPE GOUF [MOBILITY DEMONSTRATOR BLUE COLOR Ver.]

GOUFPRO1

HG Prototype Gouf [Mobility Demonstrator Blue Color Ver.] from P-Bandai fully armed with machine gun, axe and shield.

The HG Prototype Gouf -Mobility Demonstrator Blue Color Version- is a limited kit made by P-Bandai based on the regular release of the HG Prototype Gouf Tactical Demonstrator. Both of the kits are produced under the Gundam: The Origin series, but have not appeared thus far in the anime series and doubt they will since they are regarded as Mobile Suit Discovery kits which are experimental variations.

The main difference between the kits is that the regular regular release has the interchangeable arms and hands which include the beam whip, machine gun hand, and regular hand.

P-Bandai’s kit has regular arms and hands (2 fists, 1 open left hand, 1 trigger right hand), and includes a machine gun, a shield and two beam axes (a deactivated axe and an activated one). The design of the kit also has some notable difference in the inclusion of white parts in the arms and legs, as well as some nice white decals that line various areas of the body. Among the other stickers included is those denoting the number two which are displayed on the feet, lower chest and shield.

GOUFPRO4

HG Prototype Gouf [Mobility Demonstrator Blue Color Ver.] from P-Bandai with beam axe.

GOUFPRO2

HG Prototype Gouf [Mobility Demonstrator Blue Color Ver.] from P-Bandai.

GOUFPRO3

HG Prototype Gouf [Mobility Demonstrator Blue Color Ver.] from P-Bandai.

This is my first Gouf kit and I was overall pleased with the design of the kit especially the big bulky shoulder armor and the head. The big cables throughout the body give the mobile suit a bulkier aesthetic, although the cable in the torso does limit significantly the movement of the area; the kit can slightly turn right and left.

Other than that issue, I found the poseablity to be pretty standard for a High Grade kit. There weren’t any real problems that I encountered. Even the shoulder armor has a mechanism that allows you to move it to allow greater movement of the arms. The head can be turned but not quite all the way around due to the large nose and cables.

Speaking about the head, one thing that I found a bit frustrating was there was no outline on the kit itself to place the eye decal. I think it would have been nice to include on not just the eye but for the outlying stickers found on the bottom and sides of the feet, at the base of the horns and around the skirt armor. The eye decal wasn’t much of a problem once I got it centered, but the outlying stickers proved to be a problem. I’m clearly biased since I recently purchased the HG Zaku I Thunderbolt kit which does include outlines on the kit for a good portion of the stickers including the eye.

However, once you get all the stickers on the kit it adds more depth and a better contrast to the regular release which I’m still planning to purchase in the future.

GOUFPRO8

HG Prototype Gouf [Mobility Demonstrator Blue Color Ver.] from P-Bandai armed with beam axe.

Overall I really like the design of the this kit and has me itching to purchase more variations of the Gouf.

If you’ve been a fan all along of the Gouf, I would probably recommend getting the regular Origin HG release due to it having a bit more interesting and varied accessories, this kit’s accessories were adequate and a given (the axes).

The kit itself though has a fantastic design and has made me a fan of the Gouf.

HG PROTOTYPE GOUF [MOBILITY DEMONSTRATOR BLUE COLOR Ver.]

+ Interesting and varied design of the Gouf

+ A nice contrast compared to the regular release with stickers and some color variations helping to note difference

– Adequate accessories, but feels less interesting compared to regular release

– Cables significantly limit torso from moving side to side.

– No sticker outlines for eye and line decals

GOUFPRO6

HG Prototype Gouf [Mobility Demonstrator Blue Color Ver.] from P-Bandai

GOUFPRO7

HG Prototype Gouf [Mobility Demonstrator Blue Color Ver.] from P-Bandai with bazooka from System Weapon 006 from Bandai.

GOUFPRO9

HG Prototype Gouf [Mobility Demonstrator Blue Color Ver.] from P-Bandai

REVIEW HGUC GABTHLEY

The HGUC RX-110 Gabthley model from Zeta Gundam.

The HGUC RX-110 Gabthley model from Zeta Gundam.

The High Grace Universal Century RX-110 Gabthley Gundam model came out in the winter of 2005 and is based on the mobile suit featured in the 1985-1986 animated series Zeta Gundam.

The Gabthley was piloted by Titan pilots Jerid Messa and Mour Pharoah, and was featured in several episodes mainly near the mid-point of the anime series.

The mobile suit is notable for being one of several transformable mobile suits in the series; transforming from its mobile suit form to a “mobile armor” which resembles an insect.

The HGUC model retains that aspect with the Gabthley able to change forms.

The Gabthley model comes with a Feyadeen rifle, four beam sabers that are placed within sockets in the arms, a pair of hands that hold the sabers, a hand to hold the rifle and a stand that holds any pieces the model is not currently using.

The HGUC Gabthley armed with its Feyadeen beam rifle/saber.

The HGUC Gabthley armed with its Feyadeen beam rifle/saber.

The HGUC RX-110 Gabthley armed with two of its beam sabers.

The HGUC RX-110 Gabthley armed with two of its beam sabers.

HGUC RX-110 Gabthley with Feyadeen beam rifle/saber

HGUC RX-110 Gabthley with Feyadeen beam rifle/saber

HGUC RX-110 Gabthley with Feyadeen beam rifle/saber.

HGUC RX-110 Gabthley with Feyadeen beam rifle/saber.

The design of the model is amazing and one of my top five of all time for Gundam.

Zeta Gundam is known for its strange designs, and although it’s not an over the top design (like The-O or Messala), the Gabthley doesn’t look like your ordinary mobile suit with its slimmed down sleek look and insectoid influences, especially in its mobile armor form.

The model’s poseability is pretty decent for a 2005 model. It’s good, but nowhere near where Bandai has pushed the capabilities of today’s HG kits. I was pretty surprised that the arms were very flexible to the point you can do a bicep curl.

The weakest part of the model is definitely the hand that’s supposed to hold the Feyadeen beam rife/saber, made up of two parts. It falls apart very easily, and I was not able to get the hand to hold the rifle.

I specifically bought a third party pair of hands (Hobby Base’s mechanical hands for 1/144 models) since I knew beforehand about the problems.

Hobby Bases’s hands are similar to Perfect Grade hands miniaturized for High Grades. Although they are somewhat big for the HG Gabthley, they’re pretty tight and were able to grasp the rifle. It took me a lot of patience and time to put Hobby Base’s hands together, since the parts were so small, but it was well worth the effort.

The other pair of hands that come with the Gabthley perfectly hold the sabers. There are four sabers that are placed within the arms of the model.

The HGUC RX-110 Gabthley in mobile armor form.

The HGUC RX-110 Gabthley in mobile armor form.

The HGUC RX-110 Gabthley in mobile armor form.

The HGUC RX-110 Gabthley in mobile armor form.

The mobile armor form of the model looks exactly like an insect complete with its circular eyes and feet which are grasping claws that look pretty neat and can be also used in the Gabthley’s mobile suit form.

It almost looks like a robot from the Transformers series. The mobile armor form looks good, but I doubt that I would leave it in that form since I think the mobile suit looks much better.

The HGUC Gabthley is a very strange looking but interesting model. I really like the mobile suit design, and even though the model isn’t really up to par in the poseability department, there’s still a lot of various poses you can get the model in.

Just don’t count on getting the hand that’s meant to grasp to the rifle to work. I highly recommend third party hands to get any type of decent poses with the Feyadeen rifle.

I would definitely buy a Master Grade of this kit and hope Bandai looks toward Zeta Gundam for ideas for future MGs, especially from the Titan designed suits.

HGUC RX-110 Gabthley

HGUC RX-110 Gabthley

HGUC RX-110 GABTHLEY

+ Unusual and interesting design.

+ Ability to change forms to mobile armor mode.

+ Decent amount of poseability for a 2005 model.

– Hand for rifle comes apart easily. Difficult to hold the weapon properly if at all.

REVIEW MG PMX-003 THE-O

The Master Grade (MG) PMX-003 The-O

The Master Grade (MG) PMX-003 The-O

This review has been a long time coming literally. I finished the Master Grade PMX-003 The-O nearly a year ago and just dropped out of Gunpla since life got in the way of one of my favorite hobbies.

But I’m back again with not just one but two reviews, with the HG Gabthley on the way.

First, I want to take a look at The-O, the mobile suit piloted by Paptimus Scirocco in the 1985 anime series Mobile Suit Zeta Gundam.

Zeta Gundam is one of my favorite anime series of all time. Not only is it one of the best sequel series of Gundam, it also showcases some strange but interesting mecha, and The-O is a perfect example.

You can take a look at my previous posts of the work-in-progress of the kit here, but to be brief , it took an enormous amount of paint to cover the model. It’s the biggest and heaviest kit I have.

MG PMX-003 The-O

MG PMX-003 The-O

MG PMX-003 The-O

MG PMX-003 The-O

The model is a fantastic representation of Scirocco’s Titan mobile suit. The design is odd and one of a kind compared to the other well-known Gundam mobile suits, with the extreme scale of the mecha to the elongated head.

Scirocco’s mobile suits of choice have always leaned to the unusual, but it’s those attributes that clearly set it apart from others. You will enjoy having this kit on display.

The decals that come with the kit also help to accentuate the model’s superb design.

MG PMX-003 The-O

MG PMX-003 The-O

MG PMX-003 The-O

MG PMX-003 The-O

MG PMX-003 The-O

MG PMX-003 The-O

MG PMX-003 The-O

MG PMX-003 The-O

MG PMX-003 The-O

MG PMX-003 The-O

MG PMX-003 The-O

Given the size of the kit, there’s only a decent amount of poseability with the arms being the strongest points and the legs the least. You can get some good poses with the kit since it’s pretty sturdy due to the model’s big feet, but don’t expect the kind of poses you would get from a modern day Master Grade kit.

The kit came out in 2010, but as you can find in other reviews, The-O seems more like a High Grade kit in regards to it’s poseability and its inner frame.

There wasn’t a tremendous amount of parts that went into the inner frame of the kit, with complete construction taking under 3 hours.

I wasn’t expecting a tremendous amount of poses with the kit in the first place, but I would be interested to look at the recently released Master Grade Sazabi Ver. Ka to see how Bandai has evolved the inner frames for their bit kits.

MG PMX-003 The-O with rifle

MG PMX-003 The-O with rifle

MG PMX-003 The-O with beam saber

MG PMX-003 The-O with rifle with beam saber

MG PMX-003 The-O with extra hands underneath its skirt armor

MG PMX-003 The-O with extra hands underneath its skirt armor

MG PMX-003 The-O fully armed

MG PMX-003 The-O fully armed

Even though the model comes with only a handful of accessories, they’re just enough to add more to the kit’s already powerful looks. The-O comes with one beam rifle and four beam sabers, but for some reason Bandai only included two saber effects for the sabers.

In addition, two additional arms can be retracted from the kit’s front inner skirt armor. The arms look pretty good with the kit, and as an added bonus the hands can grip the beam sabers.

All in all, the MG PMX-003 The-O is an above average Gundam kit for me because of its size and looks. I had gone in knowing the kit wasn’t going to be the average Master Grade with the poseability shortcomings in mind.

If you’re a fan of Zeta Gundam or strange but awesome designed mecha, The-O would be an excellent addition to your collection.

MG PMX-003 The-O

MG PMX-003 The-O

MG PMX-003 THE-O

+ Unusual and interesting design. Captures the essence of the strange mecha featured in Zeta Gundam with The-O being one of the best representations of the series.

+ Giant and sturdy kit. Big feet allow the kit to stay upright in most positions.

+ Accessories and decals greatly enhance the look of the kit.

– Inner frame is not on par with the Master Grades of its time.

– Poseability is limited due to armor plating.


HGUC Messala Part 6: REVIEW

HGUC Messala completed with Bandai and third party water decals.

HGUC Messala completed with Bandai and third party water decals.

The HGUC Messala is a fun kit to build and pose. It’s design is so different than the mobile suits that I have. It’s an unusual, but interesting design that you would expect to come from a show like Zeta Gundam which is basically a show with a plethora of unique looking robots.

The transformable PMX-000 Messala comes from the aforementioned show and is piloted by the Titan, Paptimus Scirocco. The HGUC model of the Messala is fairly large for it’s size grade with the kit’s two large backpack thrusters making it even bigger.

I’ve seen a few reviews of the kit online unpainted, and to tell you the truth it still looks good without paint. Having said that, I did paint mine and used a few stickers the kit came with and purchased some third party decals as well.

HGUC Messala using a Master Grade stand.

HGUC Messala using a Master Grade stand.

HGUC PMX-000 Messala.

HGUC PMX-000 Messala.

Design wise, I’m all over this kit. I’ve been spending a lot of time posing it in different stances, but they’ve all been done either using an MG stand  or the stand the kit came with. The way the feet are designed, where you basically have one large toe in front and two toes in the back, it’s really a chore to get the Messala standing up.

Don’t get me wrong it’s possible to get it upright, but I’ve found more often than not, it falls over due to the size of the kit and the 2 giant thrusters in the back.

The poseability is fairly adequate given the size of the kit. Given the fact that there is no type of swivel on the torso and the straight peg connections of the joints, the Messala has a good range of movement in the arms and legs.

The stand it comes with does a great job in holding the kit.The stand holds everything! The 2 extra hands, the 2 claws , the 2 beam sabers and the connector pieces for the transormation; the stand has you covered. It’s one of the best stands I’ve come across for Gunpla, and it comes with the kit!

My only gripe is I wish the extension was a bit longer to prop the kit a bit higher, especially when you have it in Mobile Suit mode.

HGUC Messala armed with one of its giant beam sabers.

HGUC Messala armed with one of its giant beam sabers.

HGUC Messala with removable claws engaged.

HGUC Messala with removable claws engaged.

Both shoulders can open to reveal missles.

Both shoulders can open to reveal missles.

Close up shot of the Messala's beam saber.

Close up shot of the Messala’s beam saber.

The accessories for the Messala include a pair of open hands and a pair of closed hands which can hold the 2 beam sabers. It was a nice change of pace to spray paint white joints and hands after have been painting those pieces gunmetal gray for the last models I’ve done. The open hands look nice on the kit, but they are a bit fragile. They’re made up of two pieces and they’re fairly thin. They come apart pretty easily.

The claws that are attachable to the wrists are a nice addition for the model. What I really like are the 2 giant beam sabers you get with the kit. If I’m not mistaken they look very similar in color and style to the two beam sabers that come with Scirocco’s other mobile suit the Master Grade The-O. I’m fairly certain they’re exactly the same which would solve the problem of The-O’s 2 missing beam sabers (The-O kit comes with 4 beam holsters but only 2 beam sabers). Since I’m working on the kit as we speak, I’ll be sure to check it out and report what I find.

The Messala also has a cool gimmick where you can open the shoulders to reveal missiles. Another gimmick the kit has is it can transform into a Mobile Armor form.

The Messala in its Mobile Armor form.

The Messala in its Mobile Armor form.

The Messala in its Mobile Armor form.

The Messala in its Mobile Armor form.

One of the things I was expecting from the kit was some loose joints after experiencing that problem with transformable kits, namely the MG Gundam Unicorn. I’m happy to say that I didn’t experience that problem with this kit. The joints are tight in both forms.

The Mobile Armor form looks great especially with the two giant boosters prominently shown on either side of the kit. The transformation isn’t at all complex, it just basically consists of maneuvering a few pieces on the torso and legs, then some part swapping with the arms.

I think if you’re a Zeta Gundam fan, you’re definitely going to want to take a look at getting this kit. It’s Paptimus’ iconic Mobile Suit (at least from the first half of the series), and its got such a unique and interesting design.

With this kit’s video I decided to experiment with Final Cut Pro Motion a software that I started playing around with ages ago but have always wanted to learn more about.

HGUC PMX-000 Messala

HGUC PMX-000 Messala

HGUC PMX-000 Messala

HGUC PMX-000 Messala

Messala with its two giant beam sabers.

Messala with its two giant beam sabers.

HGUC PMX-000 Messala

HGUC PMX-000 Messala

HGUC PMX-000 Messala

HGUC PMX-000 Messala

HGUC PMX-000 Messala

+ Fantastic and unique design. Much different than the standard humanoid Mobile Suit.

+ Good amount of poseability given the size and amount of joints in the kit.

+ Great accessories including giant sabers and a stand that will hold everything the kit came with.

– A few loose parts on the kit including the open hands which tend to fall apart fairly easily.

– Standing the kit can be a problem since the feet are constructed unusually, but designed the way they are seen in the anime series.

HGUC Zee Zulu Part 4: REVIEW

HGUC Zee Zulu with Kotobukiya gatling gun and heat sword from Bandai's System Weapons line.

HGUC Zee Zulu with Kotobukiya gatling gun and heat sword from Bandai’s System Weapons line.

I’ve always wanted one of the Zulu mobile suits featured on the Gundam Unicorn OVAs but held off on getting one since there was always another mobile suit kit I was interested in. But I held off long enough and purchased the HGUC Zee Zulu.

The Zee Zulu is the amphibious version of the Geara Zulu mobile suit and was developed by Neo Zeon. The design, which includes underwater gear and its blue color tones, reflects its main purpose of an aquatic assault mecha.

The weapons the kit comes with are 2 heat claws attached to the wrists, 2 heat knvies and a beam rifle. For this review I added Kotobukiya’s gatling gun and a giant heat sword that came with Bandai’s Builder’s Parts System Weapon 004.

The kit also comes with flippers, an oxygen tank attached to the front of the waist, 2 power drives attached to the back and a container pack to store the beam rifle.

HGUC Zee Zulu with amphibious gear and heat claws & knives.

HGUC Zee Zulu with amphibious gear and heat claws & knives.

HGUC Zee Zulu with the 2 power drives attached to the back and the case containing the beam rifle.

HGUC Zee Zulu with the 2 power drives attached to the back and the case containing the beam rifle.

HGUC Zee Zulu with beam rifle.

HGUC Zee Zulu with beam rifle.

The kit was pretty much easy to put together, I think I may have put it all together in less than an hour after painting the kit. The few stickers that the kit came with really give the kit a much needed detail look. Specifically, where ever you see white and purple holes, those are stickers. I also applied a few waterslide decals from the HGUC Sinanju.

I’m also getting used to hand painting the insignias on the wrists, after having a bit of hard last time with the HGUC Kshatriya. The kit comes with two hands to hold the knives, one hand to hold the beam rifle and an open hand.

The poseability for the kit is about average for a High Grade. The hands and arms are great and can do a variety poses. The only thing that hinders the full movements of the arms are the shoulder armor plates. And the same can be said about the legs with some of its armor plating hindering some movements. For example you can’t do a kneeling pose with the Zee Zulu due to the armor plates in the back of the leg.

You can turn the waist left to right, and move the torso a bit up. The head is basically static,  although the peg allows you to raise the head a bit. There is also a mechanism at the bottom of the head where you can turn the mono eye left to right.

HGUC Zee Zulu with beam rifle and a heat sword from Bandai's System Weapons line.

HGUC Zee Zulu with beam rifle and a heat sword from Bandai’s System Weapons line.

HGUC Zee Zulu

HGUC Zee Zulu

HGUC Zee Zulu with aquatic gear.

HGUC Zee Zulu with aquatic gear.

Overall I like the design of the Zee Zulu. From the fins and oxygen tank, to the bluish toned colors of the mobile suit, it’s a really nice variation of the Geara Zulu for a specific environment in mind. I really like the beam claws and they look pretty good with the knives attached to the hands. The beam rifle is a must it seems for the Zulu variations, and it looks good with this kit.

I wish there was a bit more poseability in regards to the legs and arms, but what’s there should be sufficient enough for most, I guess what I really want is a Master Grade of this kit and the ability to do a kneeling pose.

There’s more than enough variation on the kit from the original Geara Zulu to enjoy, especially if you’re into aquatic robots. I went a step further with this kit and purchased additional weapons, namely Kotobukiya’s gatling gun and Bandai’s System Weapon 004, which comes with three beam swords and a beam sniper rifle (which I’ll probably review some time down the line).

HGUC Zee Zulu with Kotobukiya's gatling gun.

HGUC Zee Zulu with Kotobukiya’s gatling gun.

HGUC Zee Zulu with Kotobukiya's gatling gun.

HGUC Zee Zulu with Kotobukiya’s gatling gun.

HGUC Zee Zulu with Kotobukiya's gatling gun.

HGUC Zee Zulu with Kotobukiya’s gatling gun.

Kotobukiya’s gatling gun is enormous! Especially when you pair it up with a High Grade model. I’ve seen some pics and videos that have the weapon with a Master Grade. But with a High Grade like the Zee Zulu, it looks like a giant deadly weapon.

I did have to file down the trigger handle in order for the kit’s hand to fit. As expected for something this size, it does weigh the hands and the kit itself down. But with a little work, you can get the kit to properly handle the gatling gun and make it look good.

I know Kotobukiya’s made other weapons that can be used for Gundam models and I’ll look into getting a few. There is a special feature on the gun where you can wind up a little mechanism which allows the gun to rotate. I skipped that piece, but for anyone interested in that feature, it’s a nice one to have.

HGUC Zee Zulu with giant beam sword from Bandai's System Weapon 004.

HGUC Zee Zulu with giant beam sword from Bandai’s System Weapon 004.

HGUC Zee Zulu with giant beam sword from Bandai's System Weapon 004.

HGUC Zee Zulu with giant beam sword from Bandai’s System Weapon 004.

HGUC Zee Zulu with giant beam sword from Bandai's System Weapon 004.

HGUC Zee Zulu with giant beam sword from Bandai’s System Weapon 004.

The giant beam sword from Bandai’s System Weapon 004 line is one of three blades that comes with the pack. I didn’t even realize that Bandai’s System Weapons line existed until I started searching online for third-party customized weapons for Gundams and came across weapons from Bandai made specifically for High Grade models.

It helps A LOT that the pack comes with hands (and armor plates that you can paint) that can hold the weapon well. There is still going to be some tilting of the hands, depending on how you pose the sword, but it’s not to the point where it’s a major problem where you can’t get a decent pose out of the weapon.

I hope Bandai continues with these weapons as the packs that are out look pretty superb.

REVIEW: HG Kshatriya

HG Kshatriya

The HG Kshatriya from Gundam Unicorn using Gundam Action Base for stand.

The Gundam Unicorn OVA is one of my top Gundam animated series featuring some of my favorite mobile suit designs. I was quickly a fan of the Unicorn and the Sinanju and was quick to snatch both versions of the MG models. I was aware of the High Grade version of the Kshatriya when it came out, but I really didn’t pay much attention to it since at the time I was focused on Master Grades.

Well the HG Kshatriya might as well be a Master Grade in regards to the size. It’s huge! One of my top concerns when I started seeing pictures and reviews online was the weight and the stability of the model.

But I’m happy to say the four wings attached to the model aren’t that heavy and you can stand the Kshatriya upright without any type of stand.

As for the design of the model, it’s one of my favorites because it’s such a monster of a mobile suit!

The wings on the Kshatriya are massive but not too heavy to the point that it will drag the model down.

The wings on the Kshatriya are massive but not too heavy to the point that it will drag the model down.

The wings positioned upright. Pretty good flexibility with the wings.

The wings positioned upright. Pretty good flexibility with the wings.

Did I mention how big this thing is? The wings make it look more formidable than it already is.

Did I mention how big this thing is? The wings make it look more formidable than it already is.

The model is massively big for a High Grade and that’s one of the factors that pulled me into buying the Kshatriya. I like the color design, with a military/light green for the main body parts and a slightly darker green for the chest, torso and skirt armor. I went ahead and painted the exhaust ports found on the chest and and the side of the wings a copper color since the yellow didn’t really look right with the slight variation spray paint colors I used for the body.

One thing that I did not like, and knew that I was going to have to come across, was painting the insignias on the chest and wrists. I’m not a very good at hand painting, and it’s apparent when you look closely at the kit. I wish there was some way that Bandai could color separate the insignias. I did attempt to use the sticker insignias that came with the model, but the creases throughout the edges of the stickers was just too apparent.

Speaking of stickers, I went ahead and purchased third-party decals to compliment the Kshatriya. I know that Bandai produced decals for the HG Sinanju, and I hope in the future they will produce more decals for their HG line.

Kshatriya armed with double beam sabers

Kshatriya armed with double beam sabers

More action with the beam sabers.

More action with the beam sabers.

Kshatriya ready to attack.

Kshatriya ready to attack.

Of course with a model this big, the obvious issue would be the limited poseability. And it is a definite issue with the Kshatriya. The legs and arms have a good amount of movement, but it’s nowhere near the same as an average HG Model, where its movements are not hindered by its size. The most peculiar design, which is also a factor in the arms’ movements, would have to be the arms and shoulders, where you can’t really move one without the other, since both are connected solidly together with a peg.

There is an elbow joint that does provide a range of movement for the lower half of the arm and the hands utilize a ball joint. You only get a pair of fists that could hold beam sabers, and I wish they had included some open hands which would look really good with the kit.

The waist also uses a ball joint, but you can’t really turn the model a lot due to the side skirt armor.

The wings have a surprisingly good amount of poseability where you can move them forward and back, up and down. Bandai did a great job in designing the mechanism for the wings. The four wings also house 6 funnels each that are removable. There are no stands for the funnels included in the kit, but I purchased an action figure stand that can hold the funnels.

Also in the wings are mechanical arms that can be stretched out. It’s a pretty cool feature and one that I had forgotten about. Two beam sabers also come with the model.

Rear of the model kit with some third-party decals.

Rear of the model kit with some third-party decals.

The funnels that came with the kit on an action figure stand.

The funnels that came with the kit on an action figure stand.

A good look at the inside of the wings along with the mechanical arms stretched out.

A good look at the inside of the wings along with the mechanical arms stretched out.

The HG Kshatriya was pretty fun to put together and paint. I used about three cans of light military green Testors spray paint to paint the main body parts, very similar to the amount of paint that I would used for a Master Grade. I think an MG version, god knows when that will come out, will be similar to putting a Perfect Grade together just due to the size and the features of the Mobile Suit design.

But the HG will suffice for now.

I love the features of the Kshatriya such as the wings, funnels, green beam sabers and the mechanical arms housed in the wings. The design is incredible, it’s literally a monster of a mecha.

I’m pretty much now addicted into getting oversized Universal Century High Grade Mobile Suits, which should give you a hint of what I’m planning to get next.

HG Kshatriya

HG Kshatriya

HG Kshatriya

HG Kshatriya

HG Kshatriya

HG Kshatriya


REVIEW & VIDEO: MG Nu Gundam Ver. Ka

MG Nu Gundam Ver. Ka

MG Nu Gundam Ver. Ka with funnels deployed.

I first learned about the MG Nu Gundam Ver. Ka last year, and I was amazed at the design with more details than its previous incarnations. I wasn’t really a fan of the previous version, but was just amazed at the details and changes made to this master grade model.

In addition to its normal form, you can change various pieces of the model so that certain parts (green pscho-frame bits) are exposed to give the model a pscyho frame look. It doesn’t look really different when you change i compared to the MG Gundam Unicorn.

The model is very poseable as expected from a master grade and the weapons and shield fit perfectly into the hands thanks to a new connection system where pegs are not only found in the hands but in the accessories as well to give a very, very tight grip between the hand and weapons.

Nu Gundam with bazooka

Nu Gundam with bazooka

Nu Gundam with saber

Nu Gundam with saber

Nu Gundam with Rifle

Nu Gundam with Rifle

Nu Gundam with funnels

Nu Gundam with funnels

The Nu Gundam also comes with funnels that can be attached in the back, as pictured above. The funnels are used as separate attack units as seen in the movie Char’s Counterattack.

The good news is that the funnels look very impressive, especially when you attach each separate one to the stand. Unfortunately, when you combine the funnels and place them on the model’s back, they tend to very flimsy as they are all connected using small pegs to attach to one another.

I’ve noticed that when I place the Gundam on the stand and move it at an angle, all the funnels tend to bend towards the model. It’s not a very secure system, and at times the funnels have fallen from the model when I try to move it.

As I said before, the stand which holds the model and funnels is more than adequate to show this model off as it provides for a variety of poses while utilizing the funnel system.

Nu Gundam with funnels deployed using the very effective stand.

Nu Gundam with funnels deployed using the very effective stand.

Close up of the funnel

Close up of the funnel

It’s been about three years since I put together and painted a Gundam model. The last one I posted was the Sazabi and that took months. It was refreshing to paint the model and put it together in less than 2 weeks. I think what originally put me off building Gundam models before was how much time (and MONEY!) was involved.

My next project will be the 1/144 Qubeley by Model Comprehend and I will use the same workflow as I used with the MG Nu Gundam.

Overall, I think people who didn’t like the Nu Gundam model before, will be quite impressed with this model. There was enough changes for me to take a second look and make a purchase.

Nu Gundam Ver. Ka

Nu Gundam Ver. Ka

Nu Gundam Ver. Ka

Nu Gundam Ver. Ka

GUNPLA MOD: HG Gadessa GNZ-003 Prototype [Hilling Care]

Gadessa attacking with wrist Vulcan Cannon.

Gadessa attacking with wrist Vulcan Cannon.

     Unlike Gundam Seed, Gundam OO ‘s sequel is better than its predecessor. For me Gundam Seed should have ended after the first series. With Gundam OO, the story is expanded upon and has more compelling plots and characters.

     I really like the political story as it relates to what’s going on currently in the world. One aspect that I really enjoyed this time around were the mobile suits, especially the ones the bad guys piloted. After i saw episode 13, I decided to modify an HG Gadessa to the Innovator Hilling Care’s colors.

Continue reading

GUNPLA: MG Sinanju & MG Unicorn Gundam

Sinanju aerial strike using beam shield.

Sinanju aerial strike using beam shield.

I figured when I left this blog over a year ago that I wouldn’t return. But alas my love for Gundam and Anime has returned. I plan to continue this blog on a regular basis.  At least an update every month.

I start off with the Mobile Suit that brought me back, the MG Sinanju.  I really didn’t expect Bandai to churn this one out. I figured the company would just direct all attention to Gundam Seed and its predecessors. But I’m glad they decided to produce the mecha.

Unicorn versus Sinanju. (Digitally rendered to include flare)

Unicorn versus Sinanju. (Digitally rendered to include flare)

I also review the MG Unicorn which I had bought last year and played around with the idea of doing a post on it,  but never got to it.  My usual shooting studio, the Blue Ridge Mountains, is no longer available to me so I decided to play around with indoor settings, light and shadows and some digital manipulation.

Continue reading